1. Lesson objectives
- Review disassembling and assembling a desktop computer
- Understand the structure of the power supply unit (PSU) and the different types of power connectors found on a desktop computer
- Correctly disassemble and assemble the power connectors on a desktop computer
- Learn how to test the ATX power supply unit
2. Instruments preparation
Each student prepares the following tools:
Main tools:
- 01 Desktop computer
- 01 screwdriver
- 01 screw box
Support tools:
- 01 computer cleaning brush
- 01 cleaning cloth
3. How to test a power cord
– Assuming we have a power cord that is 10m in length, what is the method to determine if the cord is damaged or intact?
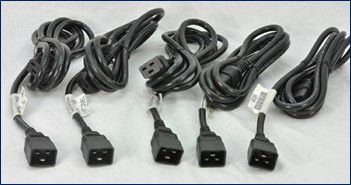
– Using a multimeter: To test a power cord with an analog multimeter, ensure that the multimeter is set to “ohms X1.” For a digital multimeter, set it to “diode test mode.” Then, insert the two probes of the multimeter into the two leads of the power cord. If the power cord is not broken, the buzzer on the multimeter will sound and the LED on the multimeter will light up.
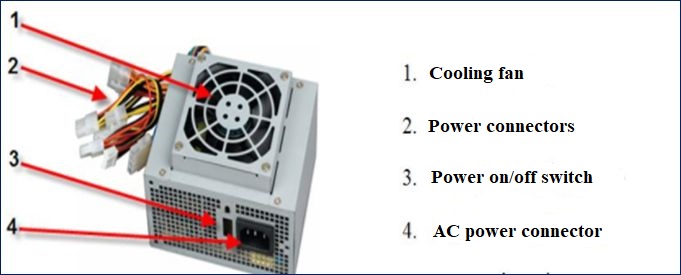
4. Power supply unit (PSU) of Desktop computer
A Power Supply Unit (PSU) gives power to motherboards, hard drives, optical drives, and other components. Its function is to convert Alternating Current (AC) to Direct Current (DC). The PSU supplies different voltages such as +3.3V, +5V, +12V, -12V, and -5V, which are needed to properly operate all computer components.
Structure of a power supply unit
Specifications of Power supply unit:
- Volt (V)
- Ampere (A)
- Watt (P)
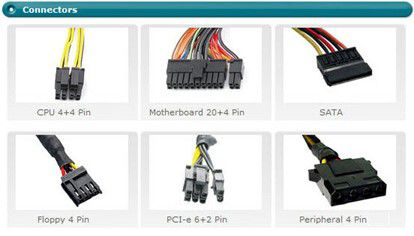
Power connectors
The pins of the PSU are color-coded for easy identification. The red power wire has a voltage of +5V, the yellow power wire is +12V, the black wire is the ground, the purple wire is +5V, the orange wire is +3.3V, and so on. There are different types of power connectors, including:
- Main power connector: 20 or 24 pins
- CPU power connector 12V: 4 pins
- Molex connector, SATA connector, PCI Express connector, and others.
| Power connector | Power consumption devices | Pins |
| Molex | Hard disk drives with IDE standard, optical drives and other devices | 4 pins, Red (5V), black (G), black (G), yellow (12V) |
| Mini Molex | Floppy disk drives | Red (5V), black (G), black (G), yellow (12V) |
| SATA | Hard disk drives with Serial ATA | 15 pins, 3.3V, 5V and 12V |
| PCIe | PCI Express cards | 6 pins |
| CPU | CPU (Central processing unit) | 4 pins |
Color of PSU connectors
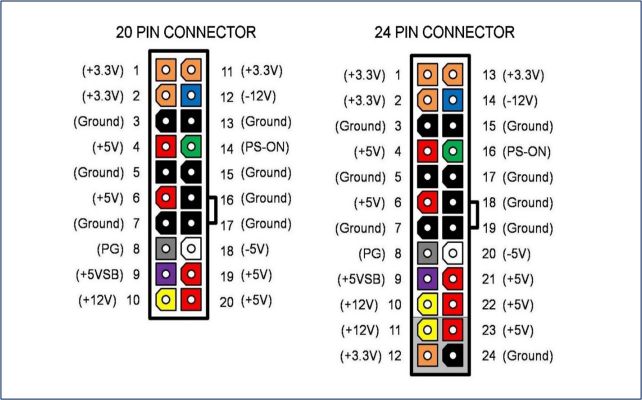
Design standards of Desktop computer
Design standards classify the power supply unit of the Desktop computer:
- AT is often found in older computers (supports CPU Pentium MMX, Pentium II, Celeron, etc.)
- ATX enables software-controlled power on/off, without requiring a physical switch. There are different types of ATX:
- ATX12V 2.X: 24-pin main connector, 4-pin auxiliary connector.
- ATX: 20-pin main connector.
- ATX12V: 20-pin main connector with 4-pin auxiliary connector.
- ATX12V 2. x: 24-pin main connector with 4-pin auxiliary connector.
- BTX is a new standard that provides power for the BTX mainboard. The BTX PSU is designed to work optimally with today’s latest technologies, such as SATA, USB 2.0, and PCI Express.
5. How to test the ATX power supply unit
– To troubleshoot a non-starting desktop computer, the first step is to verify if the power supply unit is functioning properly. Using a metal wire, you can test an ATX power supply unit by connecting pin 14 (green) to pin 16 (or any black pin).
– Instructions: Connect power to the PSU. Check if the PSU fan is spinning, indicating the PSU is working. If the fan is not spinning, the PSU is damaged. However, even if the power supply fan is spinning, it does not guarantee that the power supply unit is functioning properly 100%. We need to consider the levels of DC voltage that the power supply generates to supply the Desktop motherboard.

6. Requirement of practice
- Every student will receive practical tools.
- Disassemble and assemble the Desktop computer step by step and follow the regulations.
- Use the multimeter to test for any network cable, power cord, or metal wire.
- Check whether the power supply unit is working or not.
- Disassemble PSU and clean PSU.
- Complete the practice sheet for lesson 06.
- You are required to take pictures and record videos for documentation.
7. Practice sheet
Each student downloads the practice sheet here, photo it and bring it with you when you practice.